Using the Neatos
This document will help use the physical Neato as well as its simulated counterpart. Before going through these instructions, make sure that you have already setup your computing environment. You might also want to review the How to Use the Simulator page on this website for complimentary information.
Connecting to the Physical Neatos
This semester marks another year of physical Neatos to CompRobo! These robots were used in 2018, then made a triumphant return in 2023. These robots are long-lived because they have been cared for by the CompRobo students of yore. Please continue the tradition of Neato stewardship by treating these robots gently and letting an instructor know immediately if something is not functioning as expected.
Step 0: Find a Neato!
The Neatos will be stored on a cart in MAC 306. When selecting a Neato, look for the following:
- The Neato has a hat with a raspberry-pi brain and all of the expected wires. If any pieces of a Neato are missing, please let an instructor know.
- The battery harness wire is in good shape (not crimped, cut, or twisted). If you notice any suspect harnesses, please let an instructor know.
Step 1: Get a Neato Battery and Power on your Neato
The Neato is powered from an independent battery pack, which is externalized so that we can rapidly charge these batteries. The Neato batteries are bright green (and labeled as NiMH batteries). Charged batteries will be stored on the battery cart, in MAC 306. When selecting a battery, look for the following:
- Working batteries should have a small blue sticker on them; please do not use a battery that does not have this sticker.
- If a battery is on the charger, it will be full and ready to use if the light is green. Please do not use any batteries that are still charging. When removing a battery from a charger, please use caution and pull the connectors gently.
- (Optionally) You can check with a multimeter that the charge of the battery is at least 12V.
To attach your battery to the Neato, utilize the battery harness. Be sure to check the orientation of the plug. Once the Neato is plugged in, hit the HOME button on the Neato; the LEDs should flash green and the screen should turn on if everything is working.
Note that the Neato might complain of a low battery, a missing dustbin, or many other things when turning on. For now, those messages are safe to ignore.
Step 2: Get a Battery USB Battery Pack for the Raspberry Pi and Power the Brain
The Raspberry Pi is powered from an independent battery from the Neato (to keep them electrically isolated). These USB battery packs are available on the battery rack in the classroom. When selecting a battery, check for the following:
- The battery indicator light should be at least level 2 or over 70% (preferably full).
- The USB interfaces of the battery are clean and appear undamaged. If you run into a troublesome battery pack, please give it to an instructor.
Plug the battery pack into the Raspberry Pi. If you are using one of the cables with a small flat connector, make sure it is inserted in the proper direction (yes, it is possible to put it in backwards).
Wait about 1 minute for the robot screen to turn on. If the robot screen doesn’t turn on in a minute, or if the green LED lights on the Raspberry Pi fail to flash, please alert an instructor.
At the end of this step, you should have a Neato that has the following parts with a screen that is working:
Step 3: Connecting to the Neato from Your Laptop
Checklist before performing this step:
- Neato HOME button turns the Neato on and the screen illuminates on the Neato.
- Raspberry Pi display backlight is illuminated and not flashing on and off (see troubleshooting section for what to do if this is not the case)
- Raspberry Pi display shows that the Neato is connected to the OLIN-ROBOTICS network and has an IP address assigned to it
- Raspberry Pi display shows that the signal strength of the Neato’s connection is at least 45 (the max is 99 for the wifi adapters with attached antennas and 70 for the ones without). If the signal strength is very low see troubleshooting section for information on what to do.
- Your laptop is connected to the OLIN-ROBOTICS network. A good sanity check is to make sure you can ping the robot. You can run ping from the Ubuntu terminal by typing
ping IP_ADDRESS_OF_YOUR_ROBOT(if the connection is working you will see the time for each packet to round trip back to your computer).
In a new terminal, connect to the robot:
ros2 launch neato_node2 bringup.py host:=IP_OF_ROBOT
Where IP_ADDRESS_OF_YOUR_ROBOT is the IP address displayed on the Raspberry Pi.
Using the Neato
Moving the Neato Around
Open the teleop keyboard node. Instructions on sending various velocity commands are given then by the on-screen terminal output. The maximum speed of the neato is \(0.3 \frac{m}{s}\).
ros2 run teleop_twist_keyboard teleop_twist_keyboard
Viewing Lidar Data
Startup rviz2 in a new terminal.
rviz2
Add the /scan topic for visualization. You should see little red dots appear that represent your laser scan!
Viewing Images from the camera
NOTE: most Neatos will have a camera installed.
Startup rqt.
rqt
From the “plugins” menu, select the “visualization” submenu, and then choose “image view”. In the drop down list, select the image topic camera/image_raw.
Neato ROS Topics
This documentation gives the high-level purpose of each topic. To explore more, you can use the following command to get more information.
$ ros2 topic info /topic-name
If you want to know more about a message you see in the output of ros2 topic info you can use the following command.
$ ros2 interface show msg_package_name/msg/MessageName
accel
This is the linear acceleration of the Neato in units of earth’s gravities.
bump
This topic contains four binary outputs corresponding to each of the Neato’s four bump sensors. The individual fields are:
left_frontleft_sideright_frontright_side
cmd_vel
You publish to this topic to set the robot’s velocity. The linear.x direction sets forward velocity and angular.z sets the angular velocity.
odom
This tells you the robot’s position relative to its starting location as estimated by wheel encoders. You can get this inforation more flexibly through the ROS tf2 module, but this is a relatively easy way to get started.
projected_stable_scan
This provides the LIDAR measurements (think of these as detected obstsacles or objects from the environment). In contrast to the scan topics, these measurements are in the odometry frame (rather than relative to the robot) and are in Cartesian rather than polar coordinates. There is no need to use this topic, but for some applications it is nice to have.
scan
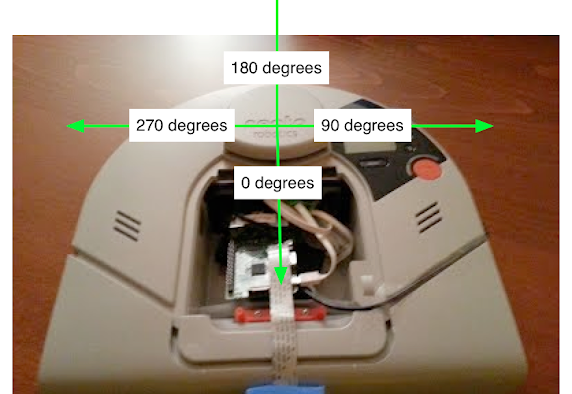
These are the measurements of the Neato’s LIDAR. This diagram should help you with the project. It shows the angles for the laser range data coming from the Neato and how it maps onto the Neato’s physical layout.
The LaserScan message consists of a number of attributes:
$ ros2 interface show sensor_msgs/msg/LaserScan
# Single scan from a planar laser range-finder #
# If you have another ranging device with different behavior (e.g. a sonar
# array), please find or create a different message, since applications
# will make fairly laser-specific assumptions about this data

std_msgs/Header header # timestamp in the header is the acquisition time of
	builtin_interfaces/Time stamp
		int32 sec
		uint32 nanosec
	string frame_id
                             # the first ray in the scan.
                             #
                             # in frame frame_id, angles are measured around
                             # the positive Z axis (counterclockwise, if Z is up)
                             # with zero angle being forward along the x axis

float32 angle_min            # start angle of the scan [rad]
float32 angle_max            # end angle of the scan [rad]
float32 angle_increment      # angular distance between measurements [rad]

float32 time_increment       # time between measurements [seconds] - if your scanner
                             # is moving, this will be used in interpolating position
                             # of 3d points
float32 scan_time            # time between scans [seconds]

float32 range_min            # minimum range value [m]
float32 range_max            # maximum range value [m]

float32[] ranges             # range data [m]
                             # (Note: values < range_min or > range_max should be discarded)
float32[] intensities        # intensity data [device-specific units].  If your
                             # device does not provide intensities, please leave
                             # the array empty.
Most of these attributes you can ignore for now. The one that you will really need to dig into is ranges. The ranges attribute provides 361 numbers where each number corresponds to the distance to the closest obstacle as detected by the laser scan at various angles relative to the robot. Each measurement is spaced exactly 1 degree apart. The first measurement corresponds to 0 degrees in the image of the Neato above. As the degrees in the image go up, so too does the index in the ranges array. Where does 361 come from? The last measurement (index 360) is the same as the first (index 0). Why do we do this craziness?!? We have to do this to adhere to some ROS conventions around LaserScan data that will be important later in the class. For now, you can safely ignore the last measurement (index 360).
stable_scan
This gives the same data as scan except the timestamp is automatically adjusted to keep the detected points stable in the odometry frame. This topic is really only need with the physical Neato robot where the precise timing of the LIDAR is not available due to hardware limitations.
tf
This is provided by the tf2 module to update the relationship between various coordinate systems. Typically, you don’t subscribe to it directly but instead use the Python tf module.
tf_static
This is provided by the tf2 module to update the relationship between various coordinate systems. Typically, you don’t subscribe to it directly but instead use the Python tf module.
Putting the Neato Away
Step 0: Turn Raspberry Pi Off
To do this, use the buttons on the Raspberry Pi. First, press down until you see the text “Press select to Shutdown”. Next, press select to shut the Pi down. Note: the button press detection code is a bit finicky, be persistent!
Step 1: Wait for the Pi to completely power off, and then disconnect the battery pack.
This is really important. If you pull the power to the Pi to soon, the SD card can become corrupted. As the Pi shuts down you will see the green light flash as the red light stays on persistently. At some point you will see the green light flash on and off at regular intervals (about once a second). Once these flashes are over, and you see no more activity for the green LED, the Pi is completely off. At this point it is safe to pull the USB cable from the battery (do not remove the end of the cable attached to the Pi).
Step 2: Disconnect the Neato battery
There is nothing elegant about this: just separate the connector from the Neato battery harness. Please use care to not pull the wires or damage the connectors.
Step 3: Put Away Your Toys
Place the Neato back on the Neato rack. Connect the USB battery pack up to the charger. Connect the Neato battery to the charger (taking care to watch the orientation of the plug and that the red light comes on). If there are no charging ports available, please queue your batteries for charging.

Troubleshooting
Symptom: Both the red and green LEDs on the Raspberry Pi are illuminated and not flashing.
Likely cause: the Pi was unable to boot from its SD card.
- Solution 1: the first thing to check is that the Raspberry Pi’s SD card is fully inserted into the Raspberry Pi. See the image below for the location of the SD card. You will know it is fully inserted if you push on the card and it clicks into place.
- Solution 2: if the card is fully inserted, the SD card may have become corrupted (possibly because some people didn’t properly shut down the Raspberry Pi!). To remedy this, grab an SD card from the green container located in the plastic drawers in AC112. Put the old SD card in the red container in the same plastic drawer.
Symptom: the Raspberry Pi display’s backlight is flashing on and off.
Likely cause: the Pi cannot connect to the robot via the USB cable.
Solution: sometimes the Neato will turn off due to inactivity. Press the large button near the Neato display to wake it up. If that doesn’t work try unplugging and replugging the USB cable from the Raspberry Pi (DO NOT unplug the USB cable from the side connected to the Neato). If that doesn’t work, shutdown and then reboot the Pi. If none of this works, the robot battery might be dead. Try recharging the Neato battery. While the battery is recharging, switch to another battery.
Symptom: the Wifi signal strength indicator on the Raspberry Pi is below 40 even though you are right near an access point.
Likely cause: The Pi has connected to an access point that is not the closest one (this will sometimes happen).
Solution: Assuming the Pi display is at the screen showing the IP address, press right to enter the network setup menu. OLIN-ROBOTICS should be highlighted with an asterisk. Press right again to reconnect the Pi to the Wifi. If it doesn’t work the first time, try one more time. If it doesn’t work then, switch to a new robot.
Symptom: you get a “Broken Pipe” error or infinite spin while trying to connect to the Neato
Likely cause: You or the Raspberry Pi are not connected to the OLIN_ROBOTICS network.
Solution: Check that you are connected to the network. Check that the Pi is connected to the network. Try to ping the IP address of the Raspberry Pi. If this all fails, then there might be something wrong with the network device on the Pi; please alert an instructor.
Other cause: The robot base is not on.
Solution: Make sure to press the Neato HOME button and ensure that the LED light turns green around the button, and that the screen turns on. Try connecting again while the Neato screen is on.